Defend 400 (NV400) User Manual
Intended Purpose
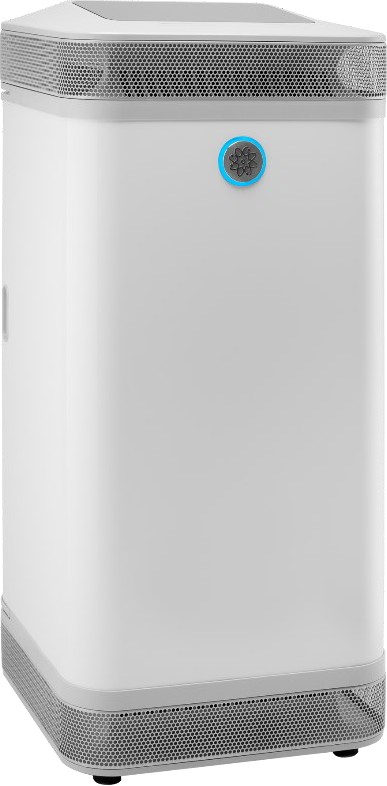
The Defend 400 (NV 400) uses WellAir's patented NanoStrike™ technology, combined with a triple-stage Camfil® filter system, to provide a powerful solution for air disinfection and particle removal.
The Defend 400 is a free-standing, portable recirculating air cleaning system designed for continuous 24/7 protection in healthcare or other commercial settings to provide airborne infection control.
The FDA has cleared the Defend 400 as a Class II Medical Device to filter out and inactivate airborne viruses and bacteria for medical purposes within medium to large rooms and indoor spaces.
The Defend 400 inactivates aerosolized viruses, bacteria, and fungi and purifies the air of pollen, particulate matter (PM), volatile organic compounds (VOCs), and odors.
The Novaerus Defend 400 Air Purifier device can be operated by any person following instructions of this manual.
Please read and follow all instructions in this manual.
Labelling Symbols




Classification of Equipment
Warnings and Cautions

Safety Features
The Defend 400 (NV400) incorporates the following safety features :
- Safety interlock switch which will not allow the device to operate if the rear door is not properly closed.
- Safety interlock switches which will not allow the device to operate if the filters are not properly inserted.
Technical Specifications

* ACH = Air changes per hour † Room with 2.44 m (8 ft) high ceiling
‡ Weight includes filters § Measured 1m from device
Instructions for Use
Moving the Defend 400
Position yourself close to the back of the device holding the handle firmly with both hands. Pull the handle slowly towards your body while stepping back onto your other foot as illustrated in Figure 1 below.
Stabilize the Defend 400 at a comfortable angle, depending on your individual height, where minimal pressure is exerted against your body to ensure stability and either push or pull it to a desired location.
Care should be taken when moving the Defend 400 to a desired location. Take extra care when moving the device up or down steps or over humps. Always lower the device down carefully, never letting it drop under its own weight.
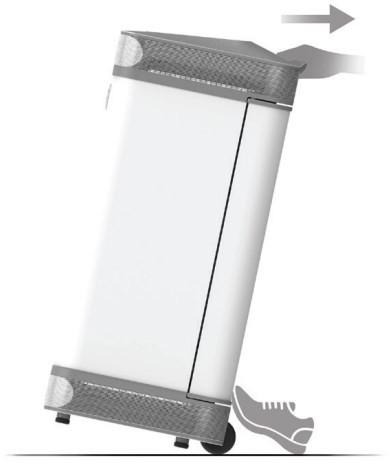
Figure 1 – Moving the Defend 400
Once you have reached your destination, allow the device to gently return to the upright position by placing one foot against the base and gently extending your forearms allowing the device to return to the front legs to stabilize the device.
The Defend 400 should be placed in a dry location and connected to a suitable grounded outlet. The product is intended to be used as a floor standing unit only. When selecting a location for the device, allow for enough space around the sides and front to ensure free airflow.
Once the device is installed at the desired location it can be powered ON.
Powering on the Defend 400
Before turning ON the device, ensure that the power supply matches the device's rated power supply as marked on the product label above the power inlet.
The Defend 400 is powered using mains power supply as described in Section 6, Technical Specifications. The device should be connected to the electric outlet using the power cable provided. Ensure the cable is properly connected to the mains power socket and to the device’s power inlet which can be found near the wheels on the rear side of the device. Once the cable has been connected, turn ON the mains power switch followed by the device’s power switch which is located beside the power inlet. Once powered, the device’s display will turn ON and show the control interface, which is described below.
Ensure all packaging is removed from the device and from the filters before powering ON the device.
Ensure all filters are secure in place and the door closed shut before powering ON the device.
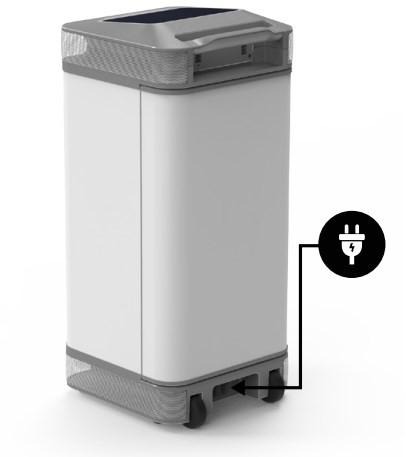
Figure 2 - Location of power inlet
Your power cable may have a built-in mechanical retaining system to prevent unexpected disconnections. To release the cable from the device, press down on the small button located on the connector housing (shown in figure 3 below) while simultaneously pulling outward.
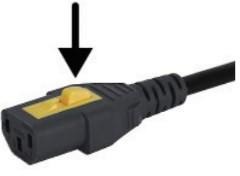
Figure 3
Control Interface
The Defend 400 can be controlled using touch screen interface on the top of the device. Figure 3 below provides a labelled layout of the interface along with a description of each of the elements below that.
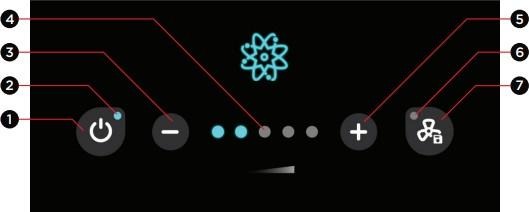
Figure 4: Defend 400 Control Interface.
- Power button.
- Power state indicator.
- Reduce airflow speed button.
- Airflow speed indicator.
- Increase airflow speed button.
- Indicator for save speed setting.
- Save/clear saved speed button.
Power Control
The device can be switched ON and OFF using the power button [1] on the left-hand side of the control interface. The power state indicator [2] will be illuminated blue when the device is powered ON and grey when powered OFF.
Airflow Control
The airflow of the device can be controlled using the increase airflow button [5] on the right-hand side, and the reduce airflow button [3] on the left-hand side. The current airflow setting is indicated in the centre by the airflow speed indicator [4], as series of 5 dots which light up from left to right as airflow speed is increased.
Save Airflow to Memory
The current speed setting can be saved to memory using the save speed button [7]. In the case of a power failure, the device will power back ON directly to the saved speed. The blue indicator on the save speed button [6] will be illuminated when a speed is saved. To clear a saved speed, use the clear saved speed button [7]. The indicator for saved speed will turn off when the saved speed is cleared.
Display Sleep Mode
To prevent disturbances and save power, the control display will go into sleep mode after one minute of inactivity. The display can be woken up by touching the display.
Service and Maintenance Instructions
Service
No serviceable parts are contained within the Defend 400 device. The devices should be opened by qualified Novaerus personnel only. It is designed with tamper-proof screws to ensure that it cannot be easily opened by anyone other than service personnel.
Filter Replacement
Before replacing filters:
- Ensure the power is switched off at the rear mains switch.
- Ensure all filters are secure in place and the door closed shut before switching the device back on via the rear mains switch.
- Only original Novaerus branded filters should be used. Using non-certified filters could affect the safety and performance of the Defend 400 and should not be used under any circumstances.
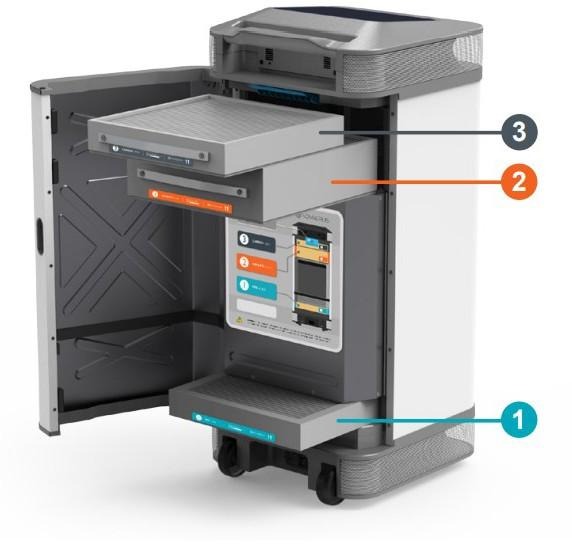
Figure 5 - Defend 400 Filters: [1] Pre-Filter, [2] HEPA Filter, [3] Carbon Filter
The filters of the Defend 400 can be accessed by opening the rear door as shown in Figure 4 above. For safety reasons, the device will not function if the door is not closed properly or if any of the filters are not inserted properly.
Pre-filter
The intake Pre-Filter is located at the very bottom of the device. It is labelled Filter 1, and coloured aqua blue (see Figure 4).
This filter should be inspected monthly and should be replaced when dirty. It is recommended to replace this filter after three (3) months of continuous use.
It is recommended that the user inspect the intake Pre-Filter monthly during the first 2 months of use to determine the most appropriate cleaning period. If enough dust and debris has collected on the filter to cause significant decrease in airflow, more frequent replacement of this filter may be required.
The Pre-Filter can be removed by simply pulling outward on the filter’s frame and replacing it with a new filter. Ensure that the filter’s label is outward facing and oriented correctly with the arrows pointed upward. Ensure that the filter is pushed all the way in.

Figure 6 – Pre-Filter Label
HEPA Filter
The HEPA Filter is located above the core of the device just below the Carbon Filter. It is labelled Filter 2 and coloured orange (see Figure 4).
The HEPA Filter should be replaced after twelve (12) months of continuous use. Discolouration on the filter may indicate that it has exceeded its life expectancy. The expected lifetime of these filters is approximately twelve months (12) under normal clean air conditions (such as that of a hospital ward).
To remove the HEPA Filter, first release the Filter Lock by pulling it upward. Next, remove the Carbon. Finally, the HEPA Filter can be removed. The HEPA Filter has a handle which can be used to pull the filter out of the device. When inserting a filter, ensure the filter's label is facing outward and oriented correctly with the arrows pointed upward. Ensure that the filter is pushed all the way in.

Figure 7 - HEPA Filter Label
Carbon Filter
The Carbon Filter is located above the HEPA Filter. It is labelled Filter 3 and coloured charcoal (see Figure 4).
The Carbon Filter should be replaced after four (4) months of continuous use. The expected lifetime of these filters is approximately four (4) months under normal clean air conditions (such as that of a hospital ward).
To remove the Carbon Filter, first release the Filter Lock by pulling it upward. The Carbon Filter will then be free to be removed. The Carbon Filter has a handle which can be used to pull the filter out of the device. When inserting a filter, ensure the filter's label is facing outward and oriented correctly with the arrows pointed upward. Ensure that the filter is pushed all the way in.

Figure 8 - Carbon Filter Label
Filter Disposal
The following instructions are for filter disposal for filters used in non-hazardous environments.
Follow the below instructions to properly dispose of a used non-hazardous air filter:
- Before you begin, have a plastic bag available.
- Turn off the Defend 400.
- Carefully remove the used air filter from the Defend 400.
- Place the filter gently into the bag, without shaking it. This will prevent the filter from releasing dust and particles into the air.
- Tie or tape the bag shut
- Take the bagged air filter and place it in the correct waste disposal stream
For filters used in enviromentally hazardous and/or biomedical hazardous air streams, follow the occupational safety and health administration guidelines in the country of origin.
Cleaning
The Defend 400 should be visually inspected on a monthly basis for accumulation of dust on the vent grills that are located at the top and bottom. It is recommended that the device be cleaned using a vacuum cleaning brush from the outside to remove any dust that may have accumulated on the grills.
Clean the body of the Defend 400 regularly to prevent dust from collecting.
- Wipe away dust from the body of the device with a soft dry cloth.
- Clean the air outlet with a soft dry cloth.
Troubleshooting
If you are experiencing a problem with your device, please check the following points:
If none of the above solutions restore normal operation, contact a representative of the Novaerus technical team for assistance.
Should the device sustain severe damage and/or an increase in noise from the internal parts is observed, discontinue use, and contact a representative of the Novaerus technical team for assistance. This product is not intended to be repaired in the field.
Do not attempt to repair the device yourself since this may cause injury and/or void the warranty.
Electromagnetic Compatibility
The Defend 400 (NV400) has been tested for Electromagnetic Compatibility to IEC 60601-1-2 for home use requirements (which is the highest standard for device EMC testing).
This includes testing that it does not interfere with and is not affected by common household RF emitters (WLAN, Wireless telephone handsets and mobile telephones) that are more than 2m (6 feet) away from the Defend 400 (NV400).
If there is any sign of mutual interference between the Defend 400 (NV400) and a Radio Frequency device, move them to be at least 2m (6 feet) apart to reduce the likelihood of interference.
Was this article helpful?
That’s Great!
Thank you for your feedback
Sorry! We couldn't be helpful
Thank you for your feedback
Feedback sent
We appreciate your effort and will try to fix the article