INSTALLATION, OPERATION & MAINTENANCE MANUAL

INTRODUCTION
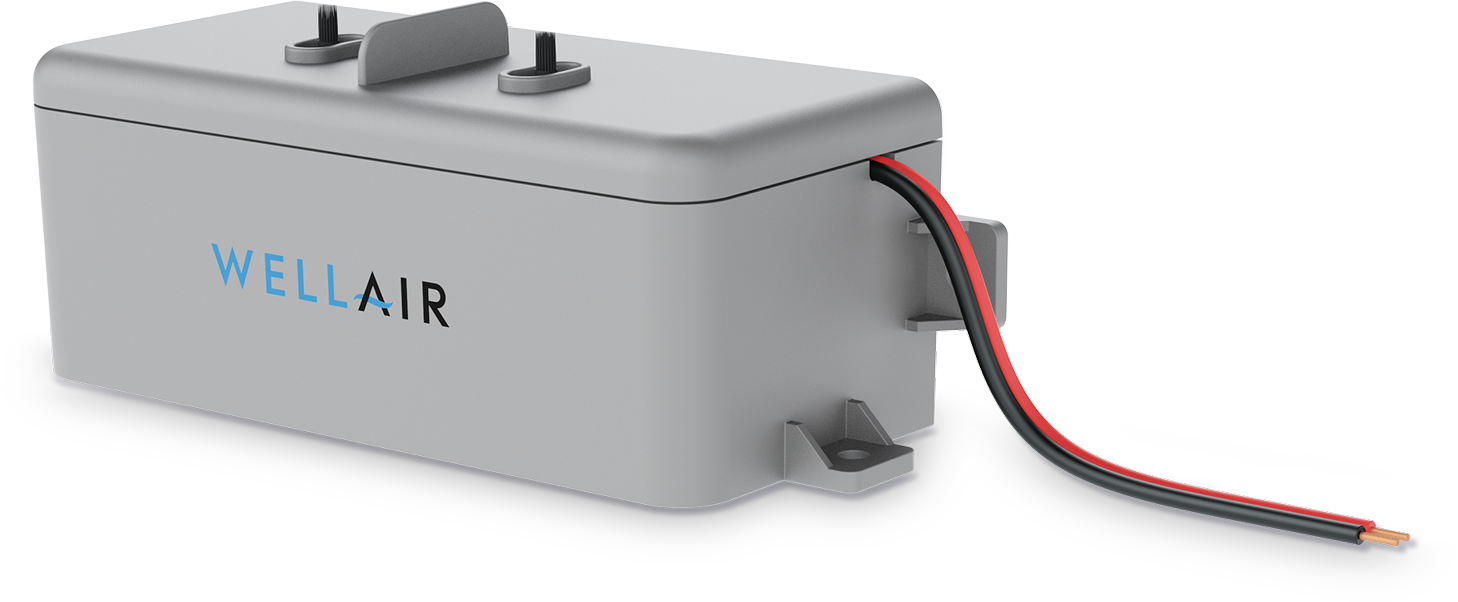
The WellAir NanoSoft CORE is a needlepoint brush type ionizer producing positive and negative ions neutralizing harmful pollutants and odors. The device includes dry contacts which can indicate ionizer functionality to a Building Automation System (BAS). Additionally, multiple units can be daisy chained into a single alarm contact. The device is self-contained in an enclosure with a molded flange, mounting holes and a set of magnets. Each ionization unit is capable of ionizing a supply airflow up to 6,000 CFM.
NO MAINTENANCE & SELF-CLEANING
The NanoSoft CORE is engineered for continuous operation without the need for replacement parts. Its advanced self-cleaning design ensures consistent, long lasting performance while eliminating the need for routine maintenance. The cleaning cycle will repeat every 24 hours.
MECHANICAL INSTALLATION INSTRUCTIONS
WARNING: Do not connect to power before mechanical installation is complete.
WARNING: Explosion hazard. Do not remove or replace lamps, fuses, or plugin
modules unless power has been disconnected or area is free of ignitable
concentrations.
WARNING: Explosion hazard. Do not disconnect while circuit is live or unless area is free of ignitable concentrations.
GENERAL MOUNTING CRITERIA:
1. Mount the ionization unit in a location that allows easy access for inspection and general maintenance.
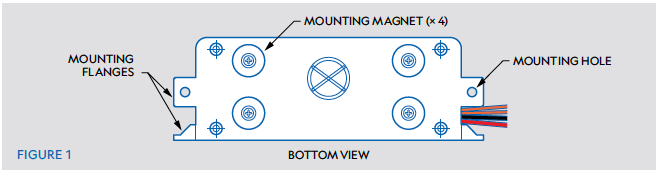
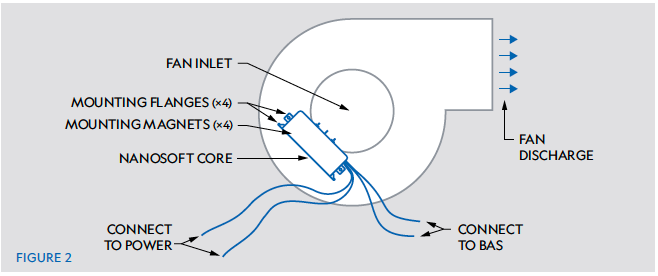
2. Install the unit at or near the fan inlet, using the holes in the mounting flanges. Ensure that the air stream flows evenly over both brushes at the same time (see Figures 1 & 2).
3. The ionizer should always be mounted downstream of the air filter.
4. For optimal performance, avoid mounting the unit directly after a cooling coil or humidifier, as excess moisture
or temperature variations can affect ionization efficiency.
5. Maintain a minimum clearance of 3/4 inch (19 mm) between the brushes and any surrounding metal surfaces or other obstructions.
Option 1: Screw Mounting
1. Select a clean, flat, and dry surface near the desired airflow location.
2. Position the ionizer and mark the screw hole locations through the mounting flanges.
3. Drill small pilot holes if necessary.
4. Secure the unit using the supplied screws.
5. Confirm that the ionizer is firmly fixed and correctly aligned before connecting power.
Option 2: Magnetic Mounting
1. Ensure the mounting surface is metallic, clean, and free from dust, oil, or paint build-up.
2. Place the ionizer in the desired position and allow the integrated magnets to hold it securely in place.
3. Verify that the unit is stable and properly oriented in the airflow.
4. Check that there is no movement or vibration during operation.
ELECTRICAL INSTALLATION INSTRUCTIONS
WARNING: Do not connect to power before installation is complete.Always
disconnect power to the unit before handling the ionizer.
1. All field wiring to be in accordance with NEC and Authorities Having Jurisdiction (AHJ).
2. It is recommended that surge protection be installed with this ionizer at the equipment level, building level, or circuit breaker panel feeding the product.
3. If a step-down transformer is used to feed the ionizer, the transformer must be grounded.
4. Do not install the ionizer on the same circuit as a UV Lamp or connect to the same transformer as a UV Lamp.
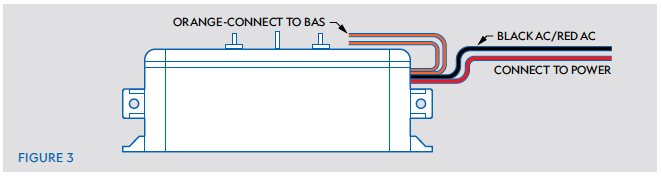
5. Connect power to ionizer using appropriate voltage: AC24V–AC240V, 50/60 Hz. See Figure 3.
6. The installer shall provide a power source that is properly grounded per the local AHJ.
7. Connect the orange, normally open, monitoring wires to the Building Automation System (BAS).
8. For best results interlock ionizer with fan control wiring.
9. Apply power to unit. When power is applied, you will hear the cleaning cycle
activate. The total time for self-cleaning is 10 seconds approximately. Within those 10 seconds the unit does 5 vibration sequences in a row. This is a normal part of the start-up sequence and confirms the ionizer is operating. Verify continuity across the orange BAS monitoring wires.
OPERATION
1. When power is supplied to the ionizer, the ionizer will be activated. and there will be continuity across the BAS monitoring wires.
2. The ionization unit is self-balancing and does not require any type of adjustment.
ADDING MORE DEVICES
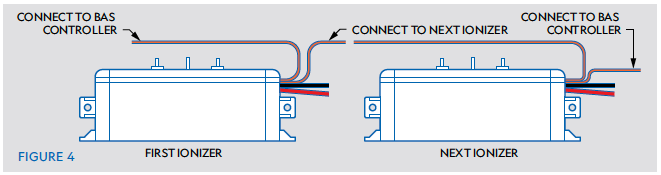
The ionizers are equipped with two orange BAS communication wires. Multiple ionizers can be daisy-chained using the orange BAS wires as shown in Figure 4.
1. Run one orange wire to the first ionizer to the BAS controller.
2. From the first ionizer, connect the second orange wire to the next ionizer by joining one of its BAS wires together and repeat this for all ionizers in sequence.
3. This forms the daisy chain connection.
4. From the last ionizer, connect the second orange wire back to the BAS controller to complete the circuit.
TROUBLESHOOTING
If the unit is not working, check the following:
1. The supply fan is running.
2. Check the power input connections to the ionization unit. Verify all connections are correct and tightened. Reconnect any loose wires as necessary.
3. Check status of ionization via BAS.
4. Test dry contact wiring with multimeter set to continuity mode.
If no issues are found:
1. Turn the ionizer off and then back on again.
2. You should hear the cleaning cycle activate. The total time for self-cleaning is 10 seconds approximately. Within those 10 seconds the unit does 5 vibration sequences in a row. This is a normal part of the start-up sequence and confirms the ionizer is operating.
3. Verify continuity across the orange BAS monitoring wires.
SEQUENCE OF OPERATION
For units that are interlocked with the supply fan control, the BAS controls the start/stop of the air conditioning unit supply fan.
Was this article helpful?
That’s Great!
Thank you for your feedback
Sorry! We couldn't be helpful
Thank you for your feedback
Feedback sent
We appreciate your effort and will try to fix the article